Cloudreve V3 安装部署详细教程
我编写了这篇关于 Cloudreve 安装和部署的详细教程,起因是我在 Cloudreve 论坛上对一篇教程提出批评后收到了反馈。这促使我反思,并决定贡献一份更全面、高效的指南。文章中,我详细介绍了多种部署方法,每种方法都附有详尽的操作步骤和优劣分析,这些都是基于我个人的实际测试和经验。我希望通过这篇文章,提供一个清晰、易于理解的指南,帮助读者有效地安装和部署 Cloudreve。我的目标是提供高质量、实用的信息,并通过这种方式向社区做出积极的贡献。
序言
这篇将讲述不同方法部署 Cloudreve 的详细操作步骤和具体优劣分析以及个人实测。
之所以决定撰写这篇文章,是因为我在 Cloudreve Forum 的评论收到了批评

https://forum.cloudreve.org/d/1829/6
尽管我仍然认为论坛文章内的教程并不高效,但我深刻地自我反省。在没有做出实际建设的情况下对别人的热心予以批判是不那么正当的。因此,我决定自己撰写一篇Cloudreve安装教程。
更新
2022.04.27
- 更改了样例中部署的版本
- 去除了 Unix Socket 配置,因为这并不是很好用。
预先说明
方法一:纯Cloudreve环境
- 优点:较为简单,所需时间少,适合私有云盘部署
- 优点:轻量,对于极低配置的服务器较为友好
- 缺点:可扩展性差,日志查询困难
- 缺点:完全无防护,可能一打就死
- 缺点:数据库可操作性低,数据量不宜过大
- 缺点:一台服务器只能运行一个web程序(即当前的Cloudreve)
方法二:脚本 Nginx+MySQL+Redis + Cloudreve
- 优点:稳定,适用于十万用户级生产环境
- 优点:数据库负载能力强
- 优点:Session 不易丢失,用户体验好
- 优点:日志可实时查询,可扩展性高
- 缺点:数据库内存溢出可能使全盘皆崩
- 缺点:依靠单服务器性能,难以实现负载均衡
- 缺点:部署时间较长
方法三:宝塔 LNM+Cloudreve
- 缺点:安全无保障(个人极度不信任宝塔)
- 优点:维护便捷
- 优点:备份机制完善
- 优点:可扩展性高
- 优点:适合新手
方法四:Docker 容器化运行
- 缺点:新手直接放弃,容器对于新手通常难以理解
- 优点:企业级架构,便于运营
- 优点:并发无上限,可以多服务器负载运行
- 优点:单节点故障不影响整体SLA,系统秒级恢复
- 优点:安全性高
- 优点:搭配k8s使用可以自动分配多个应用的负载能力
服务器预操作
本文所使用的服务器为AHdark在本地环境部署的VMWare虚拟机,操作系统为CentOS 8.5,所使用的Cloudreve程序为GitHub开源版本。
本教程更适合国内云服务器,因为教程会包含大量对国内服务器所处网络环境进行优化的步骤
更换yum源
目前已有的yum镜像源很多,本篇文章采用阿里云yum源为例子。其他的yum源仅更换相应地址即可。
如果你使用的是国内国外大厂的云服务器,请跳过此步。我相信他们一定会预配置在系统的。
此段内容来自文章:https://developer.aliyun.com/mirror/centos/
# 备份
mv /etc/yum.repos.d/CentOS-Base.repo /etc/yum.repos.d/CentOS-Base.repo.backup

# 下载新的 CentOS-Base.repo 到 /etc/yum.repos.d/

## CentOS 6
curl -o /etc/yum.repos.d/CentOS-Base.repo https://mirrors.aliyun.com/repo/Centos-6.repo

## CentOS 7
curl -o /etc/yum.repos.d/CentOS-Base.repo https://mirrors.aliyun.com/repo/Centos-7.repo

## CentOS 8
curl -o /etc/yum.repos.d/CentOS-Base.repo https://mirrors.aliyun.com/repo/Centos-8.repo

# 生成缓存
yum makecache

# 替换
sed -i -e '/mirrors.cloud.aliyuncs.com/d' -e '/mirrors.aliyuncs.com/d' /etc/yum.repos.d/CentOS-Base.repo
依赖更新
通常,预置的服务器镜像的依赖软件都较为老旧,为此我们要对其更新
yum -y update
通常第一次依赖更新所需的时间较长,请耐心等待
简单的SSH安全
系统预置的SSH通常没有较为完善的安全配置,因此我们容易被扫描到并被攻击。为此我们需要做些事以使我们的服务器不受侵害
使用密码登录较容易被暴力破解,因此我推荐你使用密钥登录
而后,我们还需要做一些基本的配置
# 备份
cp /etc/ssh/sshd_config /etc/ssh/sshd_config.backup

# 打开SSH配置文件
vi /etc/ssh/sshd_config
进行以下配置
# 去除注释
LogLevel INFO

# 去除注释并修改内容
MaxAuthTries 3
MaxSessions 5

# 添加
Protocol 2

# 如果使用密钥登陆则去除注释
PubkeyAuthentication yes

# 如果仅使用密钥登陆则修改
PasswordAuthentication no

# 去除注释并修改内容
ClientAliveInterval 600
ClientAliveCountMax 3
然后重启sshd服务
重启sshd服务之前请务必确保有一个已连接的SSH以防止服务器失联!
systemctl restart sshd
然后重新连接,查看是否成功,不成功则恢复备份
方法一:纯Cloudreve环境
优劣
- 优点:较为简单,所需时间少,适合私有云盘部署
- 优点:轻量,对于极低配置的服务器较为友好
- 缺点:可扩展性差,日志查询困难
- 缺点:完全无防护,可能一打就死
- 缺点:数据库可操作性低,数据量不宜过大
- 缺点:一台服务器只能运行一个web程序(即当前的Cloudreve)
通常个人私有云可以使用以下方式部署
操作
首先我们需要获取cloudreve源程序文件。你可以前往GitHub下载后自行上传至服务器或使用wget获取
下载
yum -y install wget
 && wget https://github.com/cloudreve/Cloudreve/releases/download/3.5.2/cloudreve_3.5.2_linux_amd64.tar.gz -O /cloudreve/cloudreve.tar.gz
解压
cd /cloudreve
tar -zxvf cloudreve.tar.gz
rm -f cloudreve.tar.gz
初始化
chmod +x cloudreve
chown root:root cloudreve
./cloudreve
请务必记住Cloudreve初次运行生成的账号密码!
记住后,按 Ctrl+C 退出程序
配置
vi conf.ini
你可以前往 Cloudreve官方文档 获取全部有关Cloudreve配置文件的信息,或使用本文提供的简易配置
[System]
Mode = master
Listen = :80
Debug = false
SessionSecret = 23333
HashIDSalt = something really hard to guss

[CORS]
AllowOrigins = *
AllowMethods = OPTIONS,GET,POST
AllowHeaders = *
AllowCredentials = false
其中 SessionSecret 和 HashIDSalt 字段会自动生成,无需更改。
如果你要启用 SSL 的话,请在conf.ini的后边添加以下内容
[SSL]
Listen = :443
CertPath = /path/to/fullchain.pem
KeyPath = /path/to/private.key
请务必将 CertPath 和 KeyPath 修改为自己的SSL证书、私钥的位置。SSL证书签发可前往 freessl.cn
,不过我更推荐购买更加正规安全的SSL证书
防火墙配置
在此环境,你只需要输入以下命令
# 开放端口
firewall-cmd --zone=public --add-port=80/tcp --permanent
firewall-cmd --zone=public --add-port=443/tcp --permanent

# 重载
firewall-cmd --reload
进程守护
由于使用GIN,Cloudreve的正常访问必须保证程序的运行
我个人推荐使用Systemd进行进程守护
# 编辑配置文件
vim /usr/lib/systemd/system/cloudreve.service
编辑内容如下
[Unit]
Description=Cloudreve
Documentation=https://docs.cloudreve.org
After=network.target
After=mysqld.service
Wants=network.target

[Service]
WorkingDirectory=/cloudreve
ExecStart=/cloudreve/cloudreve
Restart=on-abnormal
RestartSec=5s
KillMode=mixed

StandardOutput=null
StandardError=syslog

[Install]
WantedBy=multi-user.target
# 更新配置
systemctl daemon-reload

# 启动服务
systemctl start cloudreve

# 设置开机启动
systemctl enable cloudreve
随后你就可以通过以下方式启动、重启、关闭Cloudreve服务
# 启动服务
systemctl start cloudreve

# 停止服务
systemctl stop cloudreve

# 重启服务
systemctl restart cloudreve

# 查看状态
systemctl status cloudreve
解析(可选)
前往DNS,将对应域名解析至你的ip,即可正常访问服务
当然你也可以选择纯ip,但我并不推荐
搭配CDN一定是更好的选择,但你需要进一步了解CDN配置,而且这一方法并不适合搭配CDN使用
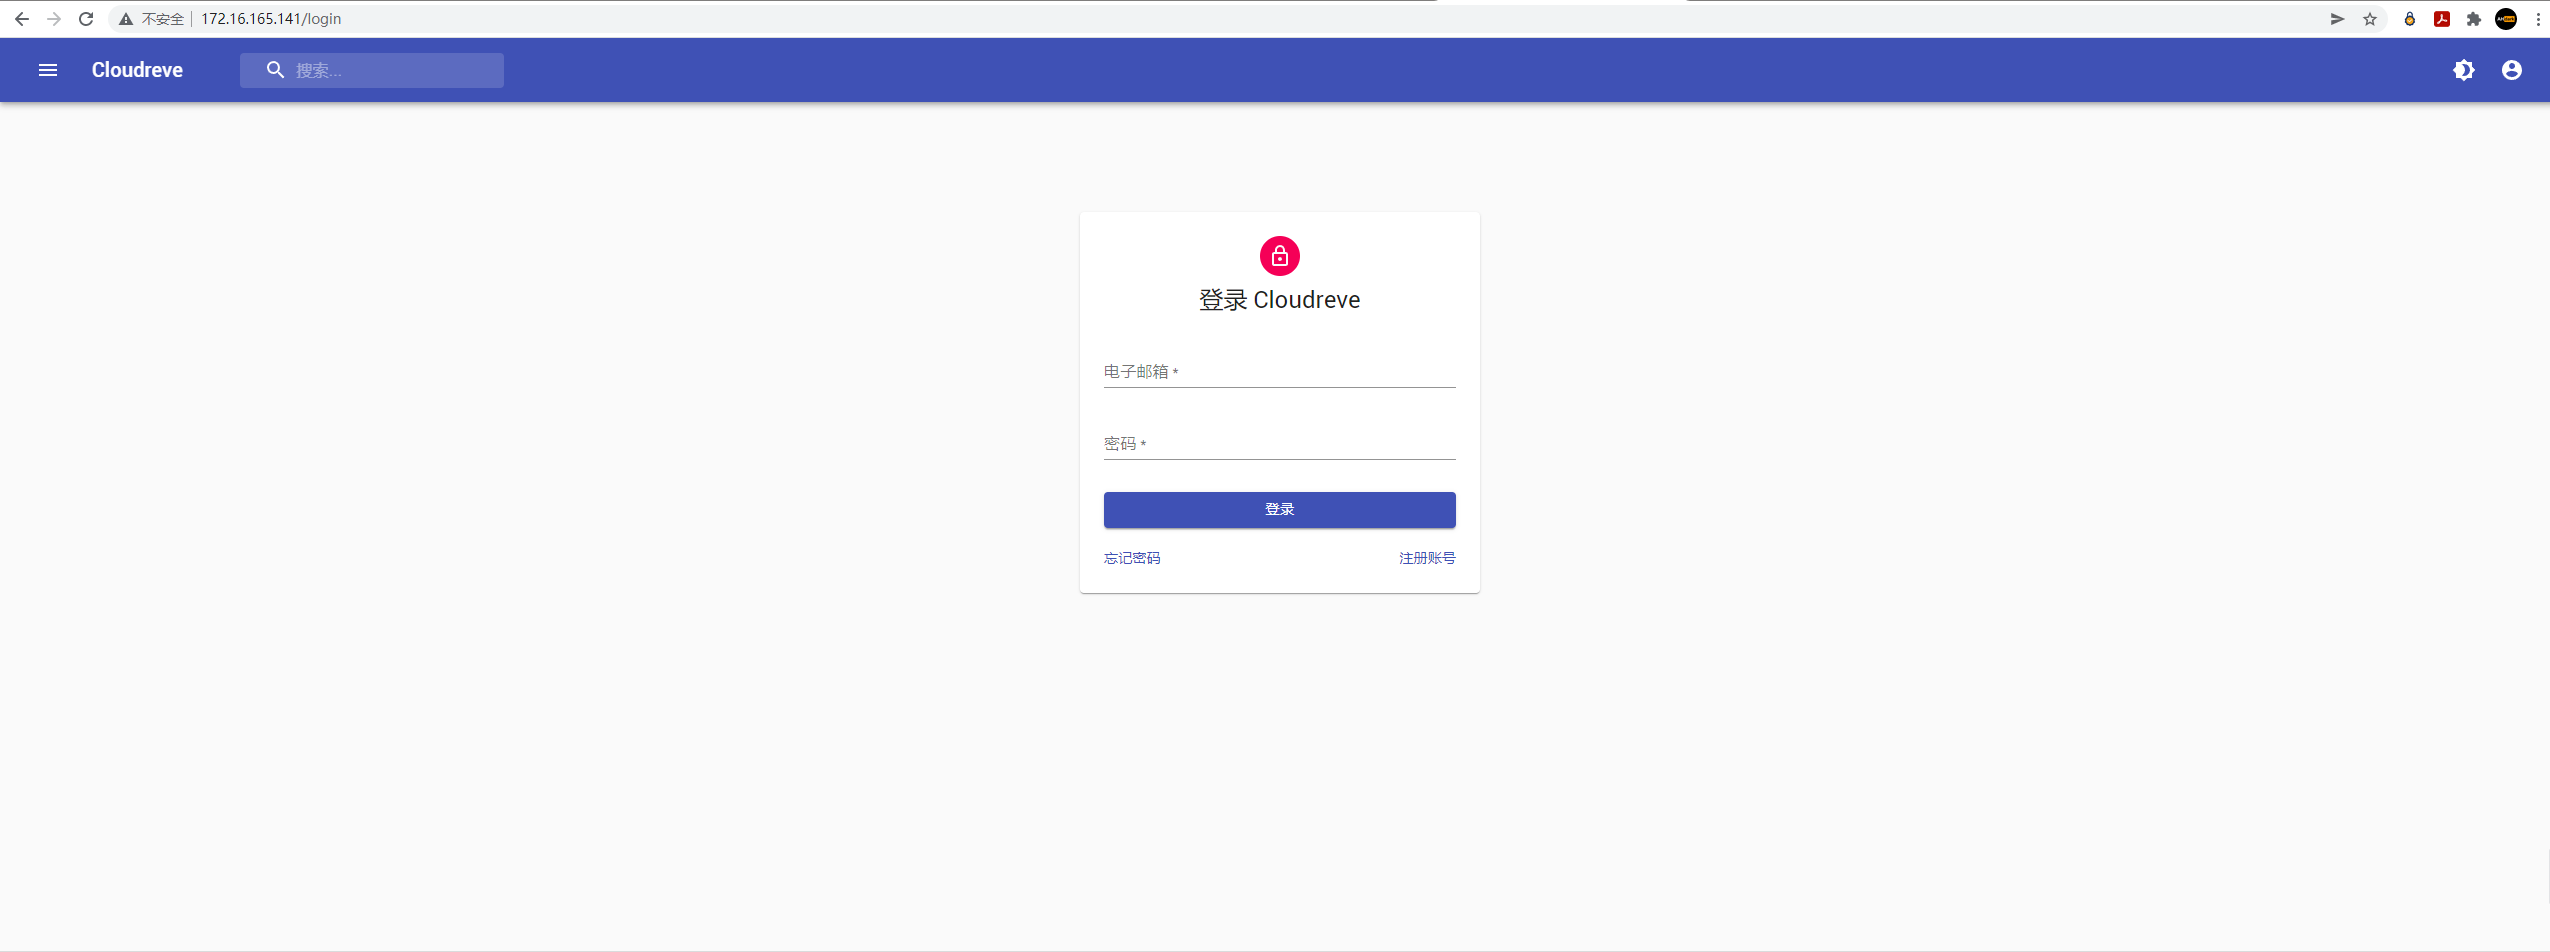
虚拟机部署成功
方法二:脚本Nginx+MySQL+Redis + Cloudreve
此示例使用 Oneinstack 脚本,我也同样鼓励你使用LNMP等脚本。
我更建议你将MySQL、Redis从Cloudreve服务器上分离以实现更高的负载能力和稳定性。
优劣
- 优点:稳定,可用于超十万用户的生产环境(实测可行)
- 优点:数据库负载能力强
- 优点:Session不易丢失,用户体验好
- 优点:日志可实时查询,可扩展性高
- 缺点:数据库内存溢出可能使全盘皆崩
- 缺点:依靠单服务器性能,难以实现负载均衡
- 缺点:部署时间较长
操作
基本Web环境部署
请自行参照 Oneinstack安装方法 进行安装
MySQL版本需要选择5.7及以上,推荐编译安装(消耗时间较长),请务必选择安装 Redis Server
新建vhost
请前往 https://oneinstack.com/install/ 获取详细信息
此图并非Cloudreve配置图,截取自Oneinstack官网
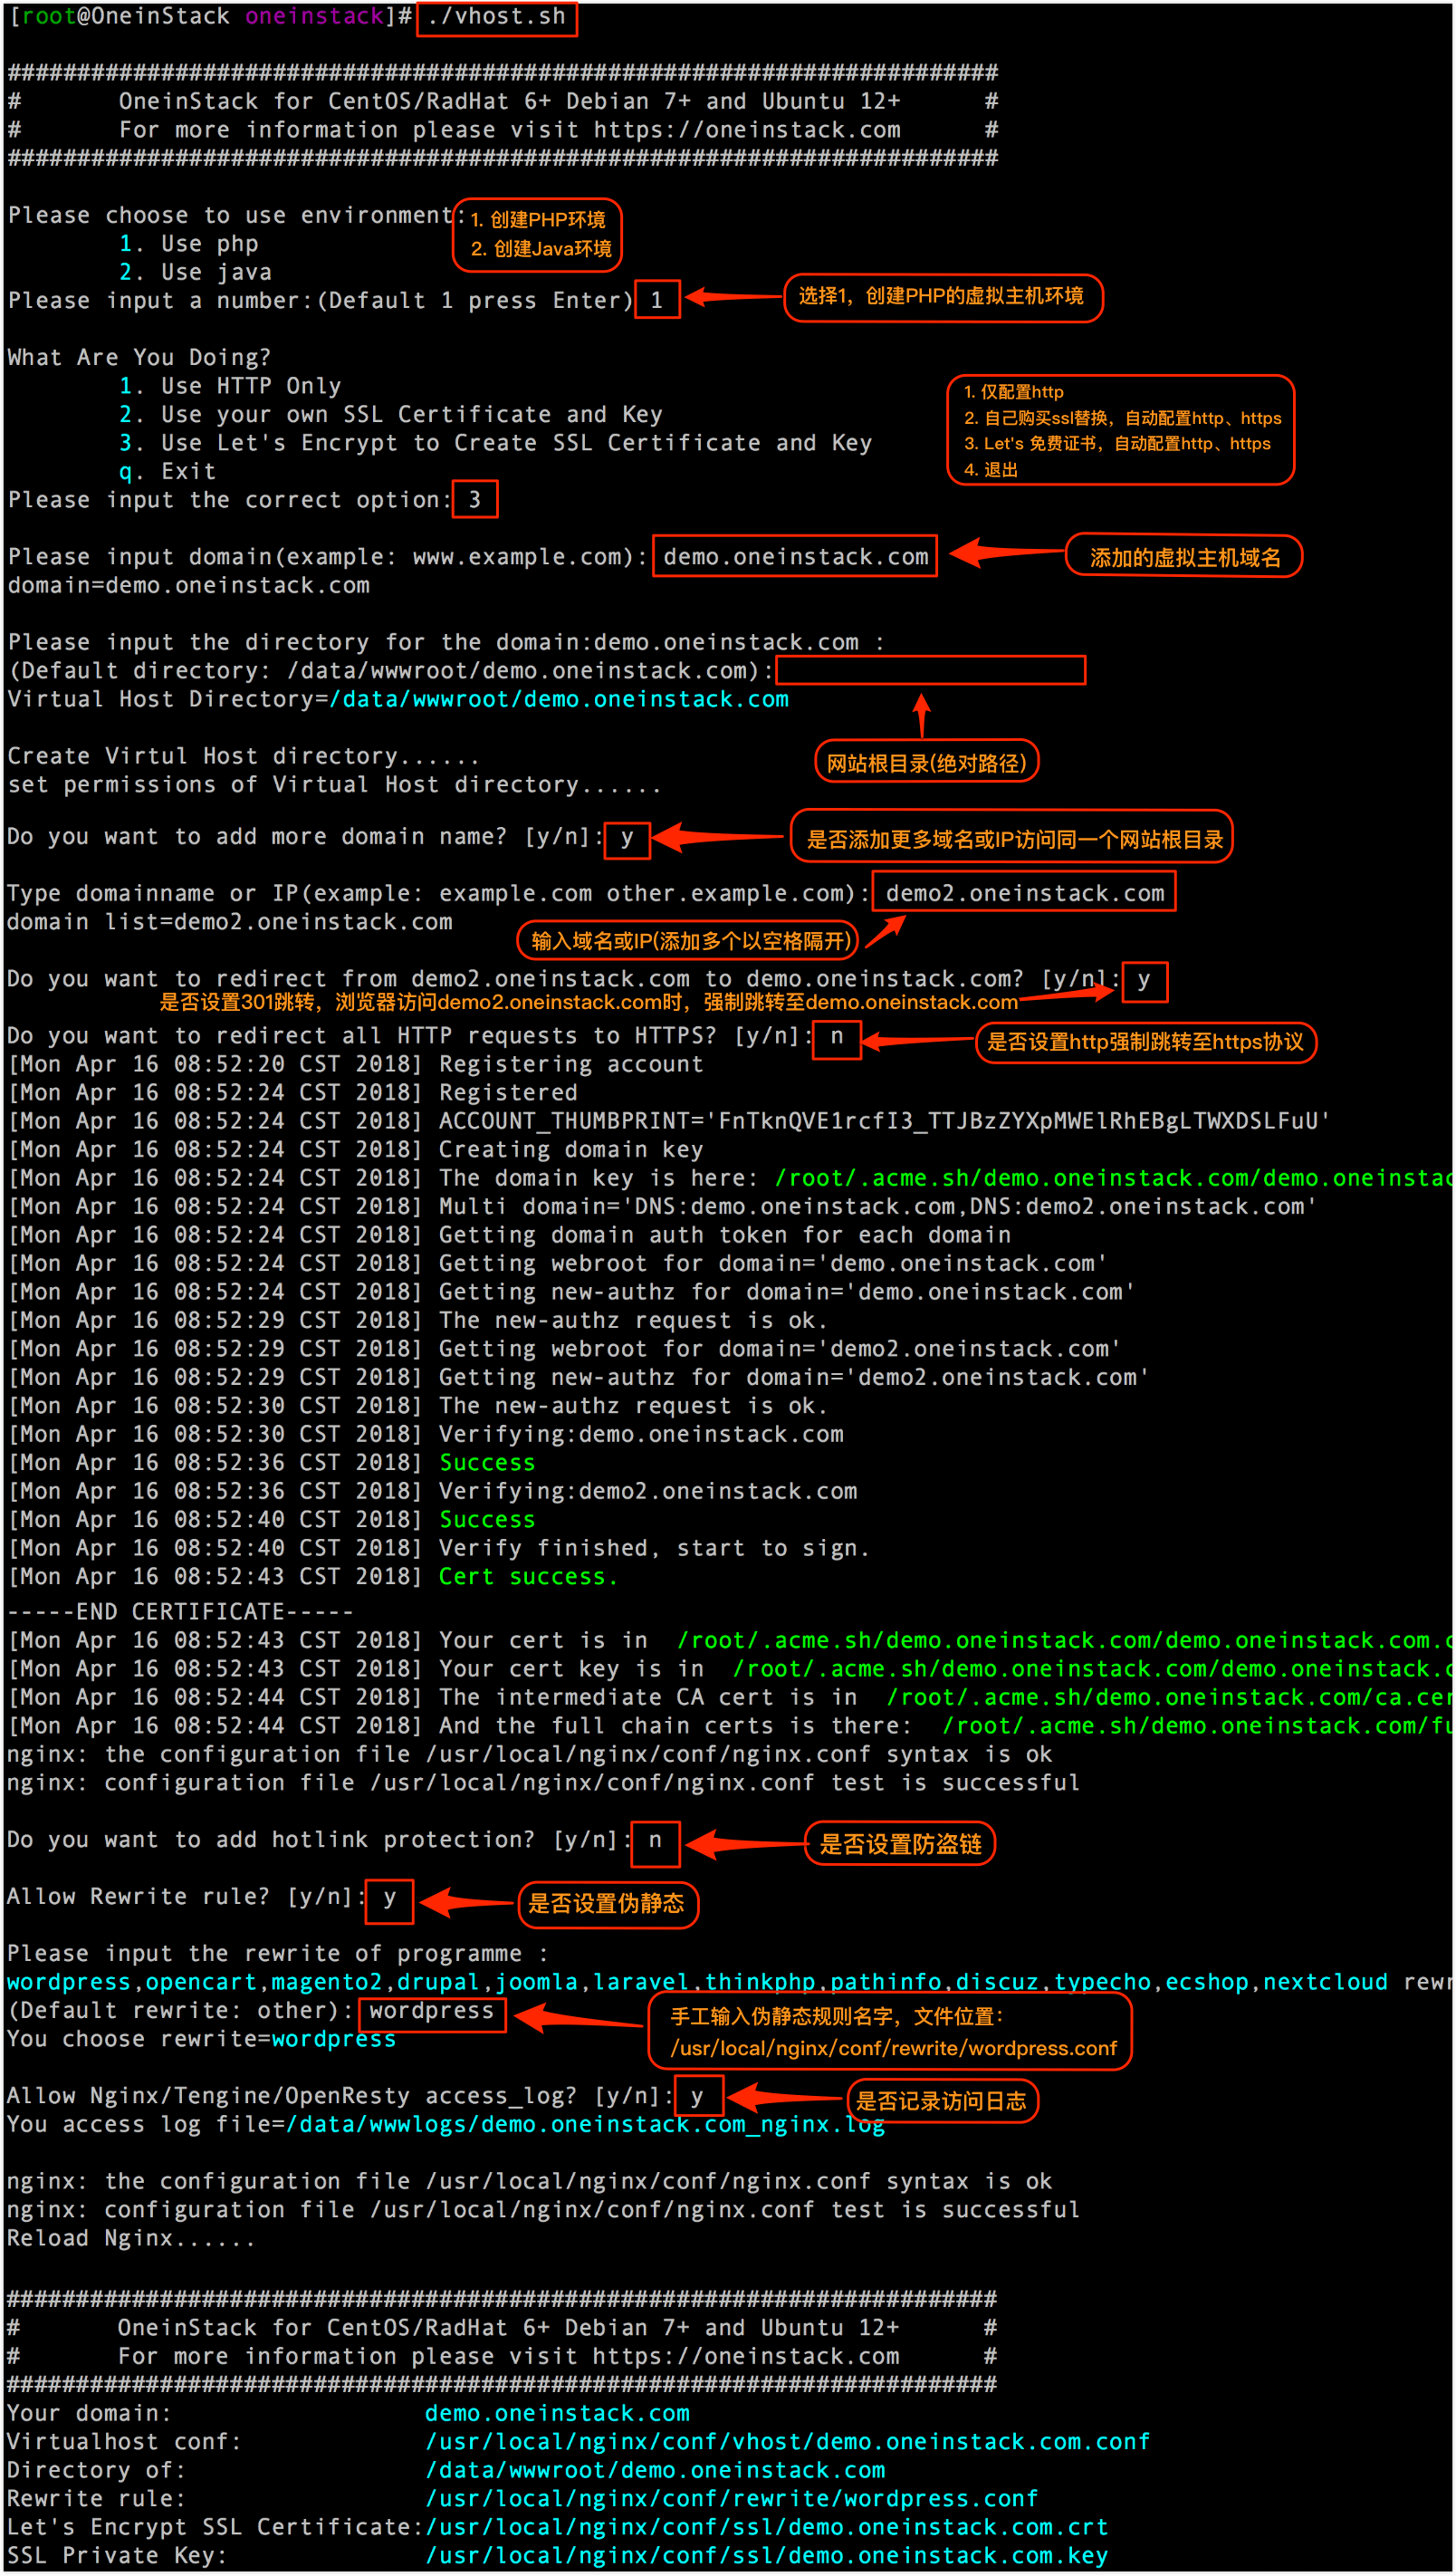
取自 https://oneinstack.com/install/
请不要开启防盗链、伪静态!
请记得将SSL证书换为自己申请的合规的证书!
下载 & 解压
进入vhost目录下,在本文示例为 /data/wwwroot/172.16.89.213

cd /data/wwwroot/172.16.89.213
通过wget下载cloudreve(同上文)
# 下载
yum -y install wget && wget https://github.com/cloudreve/Cloudreve/releases/download/3.5.2/cloudreve_3.5.2_linux_amd64.tar.gz -O cloudreve.tar.gz

# 解压
tar -zxvf cloudreve.tar.gz && rm -f cloudreve.tar.gz
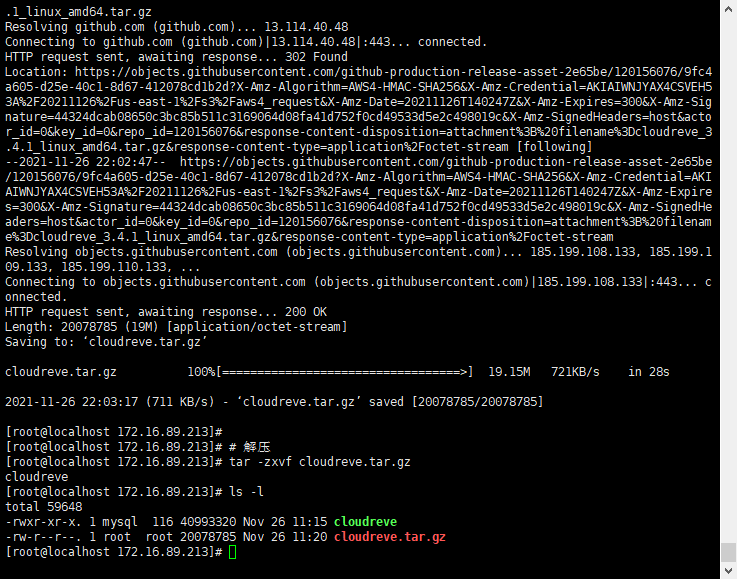
配置MySQL
在上文安装MySQL的时候Oneinstack会让你自己输入mysql密码,现在你要通过密码登录
例如:我的MySQL Root账户密码为123456
mysql -uroot -p123456
而后新建数据库和账户,请自行替换密码
CREATE DATABASE Cloudreve;
CREATE USER cloudreve@127.0.0.1 IDENTIFIED BY 'examplepassword';
GRANT ALL ON Cloudreve.* TO cloudreve@127.0.0.1;
exit;
初始化
chmod 777 cloudreve
chown root:root cloudreve
./cloudreve
此时Cloudreve程序会进行初始化并生成初始账密,但你并不需要记住它
随后编辑conf.ini
vi conf.ini
[System]
Mode = master
Listen = :5212
Debug = false
SessionSecret = 23333
HashIDSalt = something really hard to guss

[Database]
Type = mysql
Port = 3306
User = cloudreve
Password = examplepassword
Host = 127.0.0.1
Name = Cloudreve
TablePrefix = cr_
Charset = utf8

[CORS]
AllowOrigins = *
AllowMethods = OPTIONS,GET,POST
AllowHeaders = *
AllowCredentials = false

[Redis]
Server = 127.0.0.1:6379
Password =
DB = 0
由于Redis Server已包含在安装过程中,且默认无密码,直接使用即可。需要注意的是不要对外网开放Redis即可
重新运行程序进行数据表生成
./cloudreve
此时请记住管理员账密,但不急着登录
配置进程守护
由于使用GIN,Cloudreve的正常访问必须保证程序的运行
我个人推荐使用Systemd进行进程守护
# 编辑配置文件
vim /usr/lib/systemd/system/cloudreve.service
编辑内容如下
[Unit]
Description=Cloudreve
Documentation=https://docs.cloudreve.org
After=network.target
After=mysqld.service
Wants=network.target

[Service]
WorkingDirectory=/data/wwwroot/172.16.89.213
ExecStart=/data/wwwroot/172.16.89.213/cloudreve
Restart=on-abnormal
RestartSec=5s
KillMode=mixed

StandardOutput=null
StandardError=syslog

[Install]
WantedBy=multi-user.target
随后更新配置
# 更新配置
systemctl daemon-reload

# 启动服务
systemctl start cloudreve

# 设置开机启动
systemctl enable cloudreve
随后你就可以通过以下方式启动、重启、关闭Cloudreve服务
# 启动服务
systemctl start cloudreve

# 停止服务
systemctl stop cloudreve

# 重启服务
systemctl restart cloudreve

# 查看状态
systemctl status cloudreve
配置Nginx反代
首先编辑Nginx vhost对应配置文件
vi /usr/local/nginx/conf/vhost/127.0.0.1.conf
upstream cloudreve {
  server 127.0.0.1:5212;
}
server {
  listen 80;
  listen [::]:80;
  listen 443 ssl http2;
  listen [::]:443 ssl http2;
  ssl_certificate /usr/local/nginx/conf/ssl/172.16.89.213.crt;
  ssl_certificate_key /usr/local/nginx/conf/ssl/172.16.89.213.key;
  ssl_protocols TLSv1.1 TLSv1.2 TLSv1.3;
  ssl_ciphers TLS13-AES-256-GCM-SHA384:TLS13-CHACHA20-POLY1305-SHA256:TLS13-AES-128-GCM-SHA256:TLS13-AES-128-CCM-8-SHA256:TLS13-AES-128-CCM-SHA256:EECDH+CHACHA20:EECDH+AES128:RSA+AES128:EECDH+AES256:RSA+AES256:EECDH+3DES:RSA+3DES:!MD5;
  ssl_prefer_server_ciphers on;
  ssl_session_timeout 10m;
  ssl_session_cache builtin:1000 shared:SSL:10m;
  ssl_buffer_size 1400;
  add_header Strict-Transport-Security max-age=15768000;
  ssl_stapling on;
  ssl_stapling_verify on;
  server_name 172.16.89.213;
  access_log /data/wwwlogs/172.16.89.213_nginx.log combined;

  location / {
    proxy_pass http://cloudreve;
    proxy_set_header X-Forwarded-For $proxy_add_x_forwarded_for;
    proxy_set_header Host $http_host;
    proxy_redirect off;
  }

  location ~ /(\.user\.ini\.ht\.git\.svn\.projectLICENSEREADME\.md) {
    deny all;
  }
  location /.well-known {
    allow all;
  }
}
从理论上是可以实现多个 Cloudreve 后端负载均衡的,只需在
upstream {}中加入更多 server 即可,前提是 server 及对应端口必须可用且所有
Cloudreve 必须共享 Redis 和数据库。
随后重载Nginx
systemctl reload nginx
而后确认Cloudreve正常运行
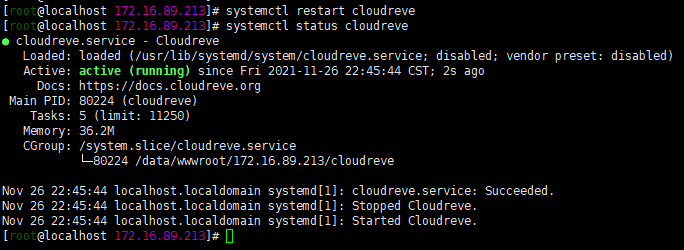
Cloudreve 状态
Pro需要对.sock文件进行权限修正
chmod 777 /run/cloudreve.sock
而后按指定域名访问即可进入Cloudreve
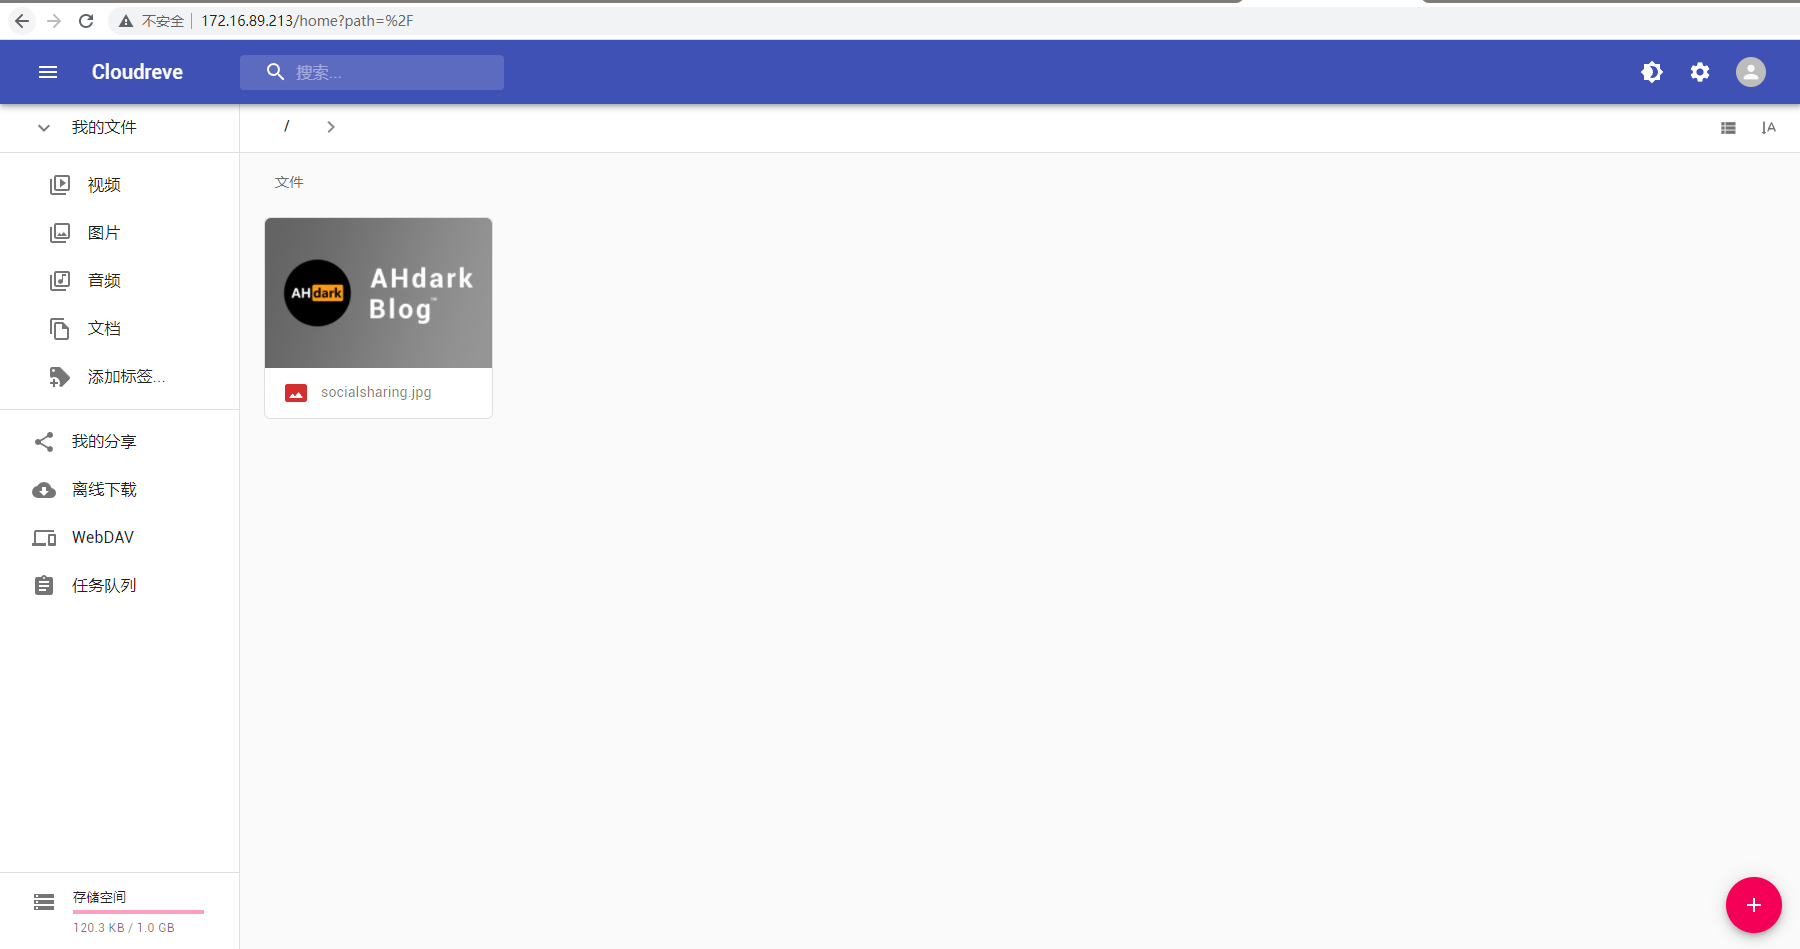
访问成功
方法三:宝塔LNM+Cloudreve
优劣
- 缺点:安全难以保障(个人极度不信任宝塔,尤其是删库事件以后)
- 优点:维护便捷
- 优点:备份机制完善
- 优点:可扩展性高
- 优点:适合新手
操作
环境安装
安装宝塔,可参照 https://www.bt.cn/bbs/thread-19376-1-1.html
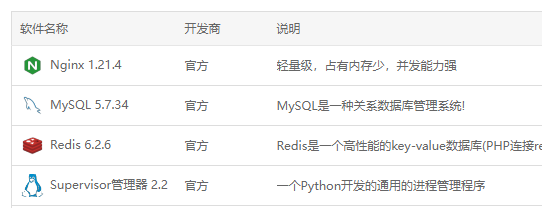
前往【软件商店】下载安装以下软件
- Nginx 1.18 或更高
- MySQL 5.7 或更高(至少5.7,否则 Cloudreve 无法运行!)
- Redis
- Supervisor 管理器
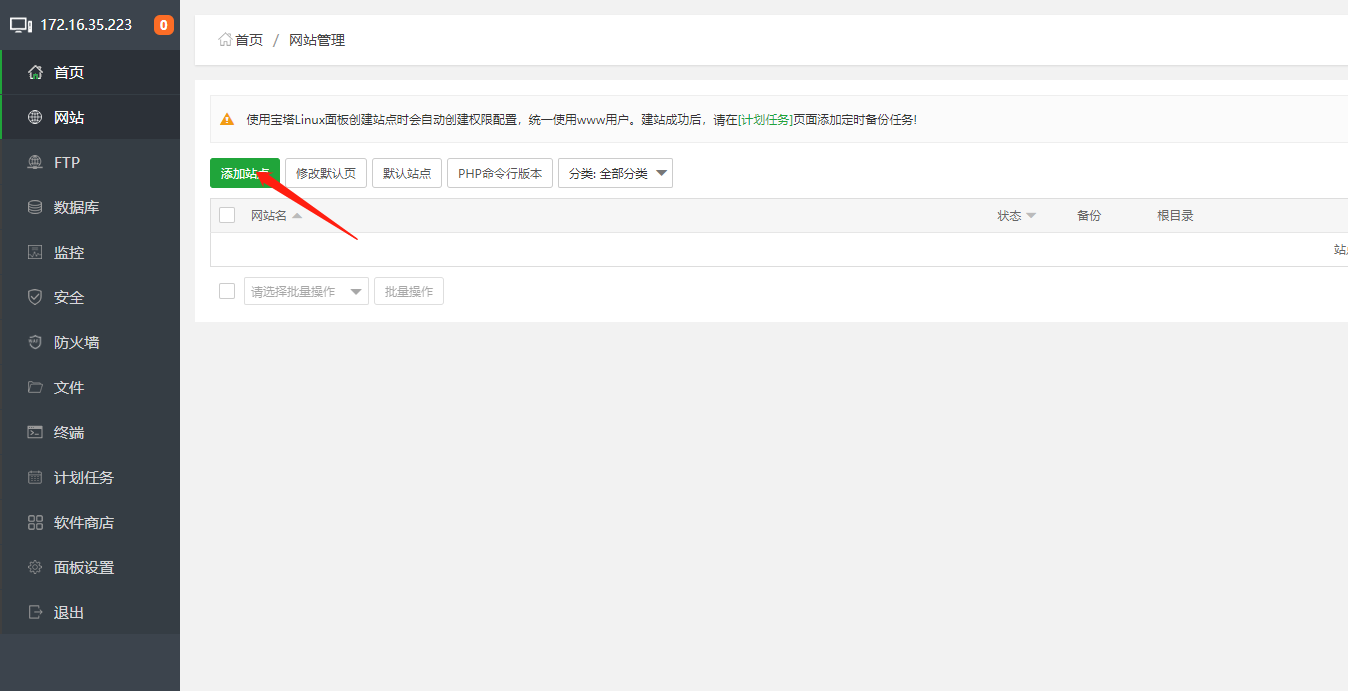
新建网站
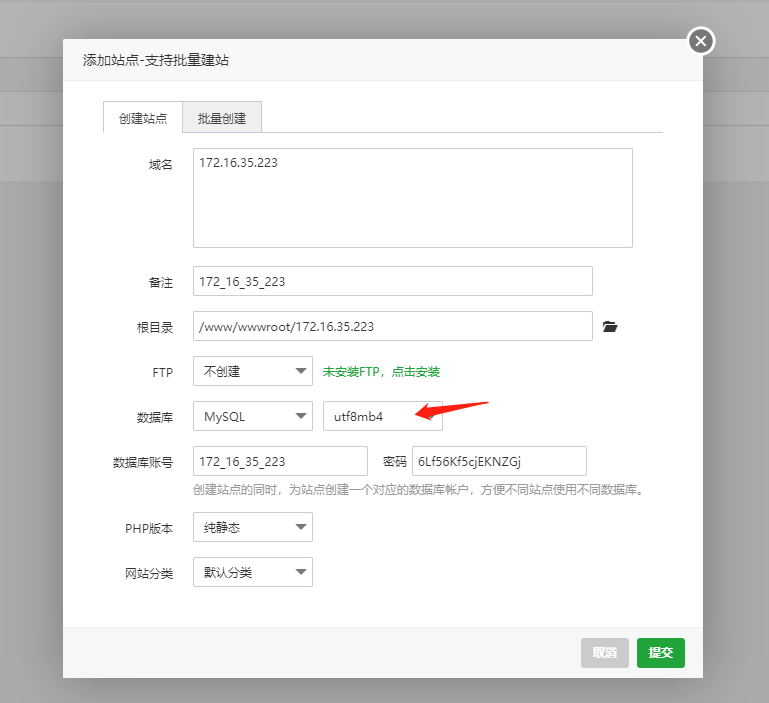
请务必选择 utf8mb4
请不要使用PHP
前往 github.com/cloudreve/Cloudreve/releases 下载 amd_64
安装包并上传至服务器目录下

初始化
在Cloudreve目录下打开【终端】
chmod 777 cloudreve
chown root:root cloudreve
./cloudreve
此时Cloudreve程序会进行初始化并生成初始账密,但你并不需要记住它
随后编辑conf.ini
[System]
Mode = master
Listen = :5212
Debug = false
SessionSecret = 23333
HashIDSalt = something really hard to guss

[Database]
Type = mysql
Port = 3306
User = 172_16_35_223
Password = 6Lf56Kf5cjEKNZGj
Host = 127.0.0.1
Name = 172_16_35_223
TablePrefix = cr_
Charset = utf8mb4

[CORS]
AllowOrigins = *
AllowMethods = OPTIONS,GET,POST
AllowHeaders = *
AllowCredentials = false

[Redis]
Server = 127.0.0.1:6379
Password =
DB = 0
由于Redis Server已包含在安装过程中,且默认无密码,直接使用即可。需要注意的是不要对外网开放Redis即可
请记得将数据库信息改为正确信息
重新运行程序进行数据表生成
./cloudreve
此时请记住管理员账密,但不急着登录
Supervisor
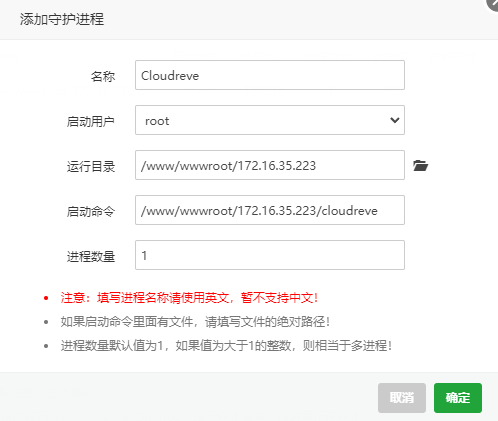
如图填写即可
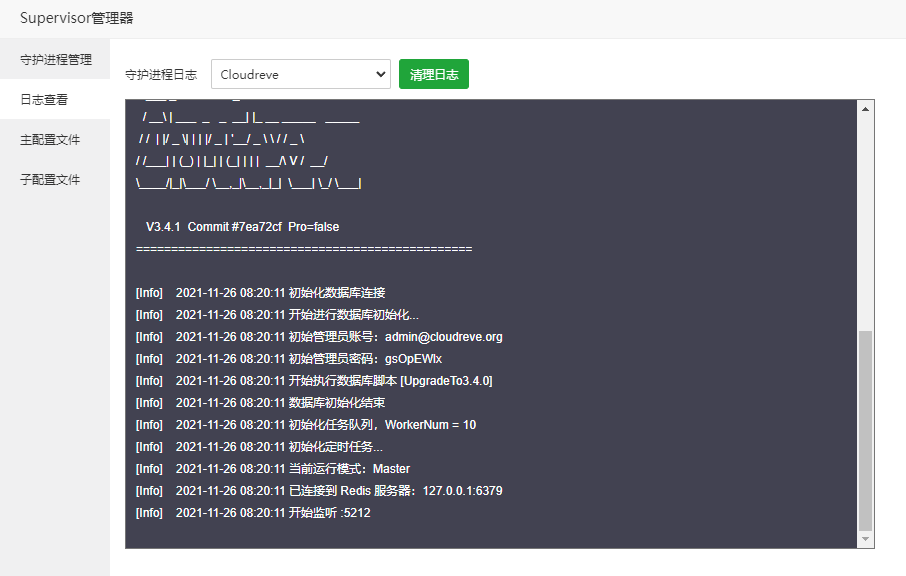
有日志即为正常
Nginx反代
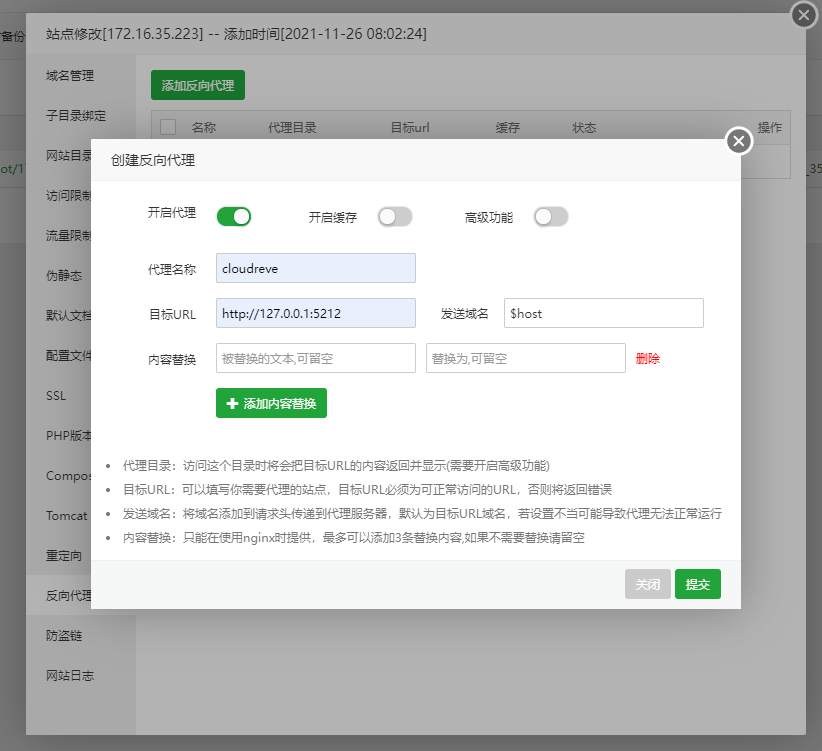
添加反向代理配置
如图,即可
方法四:容器化运行
在 Cloudreve 3.5 发布后,Aaron
在官方文档页面更新了 Docker 部署教程,同时在Docker
Hub发布了Cloudreve Image,部署变得简单了许多,因此我在 2021.04.27 完善了此方法。
2022.10.02 补充:为方便容器部署,我向 Cloudreve 提交了 通过环境变量配置应用程序 的 Pull
Request (cloudreve/Cloudreve#1475)。待其审阅完毕合并主分支后,我将撰写详细的应用方法。
优劣
- 缺点:容器对于新手通常难以理解
- 缺点:Docker 对于服务器性能有些许损耗
- 优点:企业级架构,便于运营
- 优点:并发无上限,可以多服务器负载运行
- 优点:单节点故障不影响整体 SLA ,系统秒级恢复
- 优点:安全性高
Docker 操作
创建目录结构
请确保运行之前:
- 手动创建
conf.ini空文件或者符合 Cloudreve 配置文件规范的conf.ini, 并将<path_to_your_config>替换为该路径 - 手动创建
cloudreve.db空文件, 并将<path_to_your_db>替换为该路径 - 手动创建
uploads文件夹, 并将<path_to_your_uploads>替换为该路径 - 手动创建
avatar文件夹,并将<path_to_your_avatar>替换为该路径
或者,直接使用以下命令创建:
mkdir -vp cloudreve/{uploads,avatar} \
    && touch cloudreve/conf.ini \
    && touch cloudreve/cloudreve.db
运行
docker run -d \
    -p 5212:5212 \
    --mount type=bind,source=<path_to_your_config>,target=/cloudreve/conf.ini \
    --mount type=bind,source=<path_to_your_db>,target=/cloudreve/cloudreve.db \
    -v <path_to_your_uploads>:/cloudreve/uploads \
    -v <path_to_your_avatar>:/cloudreve/avatar \
    cloudreve/cloudreve:latest
Docker Compose 操作
创建目录结构
mkdir -vp /cloudreve/{uploads,avatar} \
&& touch /cloudreve/conf.ini \
&& touch /cloudreve/cloudreve.db \
&& mkdir -p /aria2/config \
&& mkdir -p /data/aria2 \
&& chmod -R 777 /data/aria2
创建 docker-compose
请注意修改 yml 文件中的 <your_aria_rpc_token>
vi docker-compose.yml
version: "3.8"
services:
  cloudreve:
    container_name: cloudreve
    image: cloudreve/cloudreve:latest
    restart: unless-stopped
    ports:
      - "5212:5212"
    volumes:
      - temp_data:/data
      - /cloudreve/uploads:/cloudreve/uploads
      - /cloudreve/conf.ini:/cloudreve/conf.ini
      - /cloudreve/cloudreve.db:/cloudreve/cloudreve.db
      - /cloudreve/avatar:/cloudreve/avatar
    depends_on:
      - aria2
  aria2:
    container_name: aria2
    image: p3terx/aria2-pro
    restart: unless-stopped
    environment:
      - RPC_SECRET=<your_aria_rpc_token>
      - RPC_PORT=6800
    volumes:
      - /aria2/config:/config
      - temp_data:/data
volumes:
  temp_data:
    driver: local
    driver_opts:
      type: none
      device: /data
      o: bind
运行
docker-compose up -d


