Kubernetes 部署 WordPress 的方法

主要使用工具的介绍
在本节中,我们将介绍 Kubernetes 和 Helm 的基本概念,这些知识是理解如何在 Kubernetes 集群上部署 WordPress 的基础。
Kubernetes 简介
Kubernetes 是一个开源的容器编排平台,用于自动化容器的部署、扩展和管理。Kubernetes 提供了一个统一的 API
和工具,使得容器的部署和管理变得更加简单和可靠。它可以管理运行在多台机器上的容器,确保容器应用程序的高可用性、弹性、伸缩性和安全性。
Kubernetes 主要包括以下核心概念:
- Pod:Kubernetes 中最小的可部署单元,包含一个或多个紧密关联的容器。
- Deployment:用于管理 Pod 的副本数量和更新。
- Service:用于暴露 Pod 或 Deployment 在集群内部和外部的网络地址。
- Volume:用于将持久化数据挂载到容器中。
- Namespace:用于将 Kubernetes 资源进行逻辑上的隔离和分组。
Helm 简介
Helm 是一个 Kubernetes 包管理器,用于创建、共享和部署预定义的 Kubernetes 应用程序包(称为 charts)。Helm 通过使用 charts 来抽象 Kubernetes 的复杂性,简化了应用程序的部署和管理。使用 Helm 可以轻松创建自定义 charts,并将它们分享给其他人使用。
Helm 主要包括以下核心概念:
- Chart:Kubernetes 应用程序包的预定义模板。这个模板可以同时包括 Service、Deployment、Ingress 等,因此您无需执行多个
kubectl apply -f命令就可以部署应用。 - Release:在 Kubernetes 上安装的特定 Chart 实例。
- Repository:用于存储和共享 Charts 的位置。
在接下来的章节中,我们将更深入地介绍 Helm 和如何使用它来部署 WordPress。
KubeSphere 简介
KubeSphere 是一款基于 Kubernetes 的容器平台,它提供了一系列的工具和服务,帮助用户在 Kubernetes 上管理和运行应用程序。KubeSphere 通过简化 Kubernetes 的使用,提供了一个更加易用和友好的界面,以便用户更加便捷地部署、管理和扩展 Kubernetes 应用程序。
KubeSphere 提供了一些核心概念,例如 Workspace、项目、命名空间等,它们用于组织和管理 Kubernetes 资源,以实现更好的应用程序管理和资源隔离。
要使用 KubeSphere,您需要理解以下概念:
- Cluster:KubeSphere 中多租户系统的层级之一,指一组物理或虚拟机器组成的 Kubernetes Cluster,它是 KubeSphere 的基本管理单元。在 KubeSphere 中,您可以将多个 Kubernetes Cluster 添加到不同的 Cluster Group 中进行管理,并且可以通过 KubeSphere 界面轻松管理集群的节点、Pod 和服务等。
- Workspace:Workspace 是指一组共享 Kubernetes Cluster 资源的用户和 Project。在 KubeSphere 中,Workspace 可以被看作是一个逻辑上的虚拟组织,它可以包含多个 Project,并提供资源隔离和管理。
- Project:Project 是 Workspace 中的一个子级,它是一组关联的 Kubernetes 资源(如 Pod、Service、ConfigMap 等)的集合。在 KubeSphere 中,Project 可以帮助用户在共享的 Kubernetes Cluster 上进行资源隔离和管理。每个 Project 都有自己的成员和角色,可以让不同的团队和用户在同一个 Kubernetes Cluster 上独立开发和部署应用程序,同时确保安全性和资源利用率。
KubeSphere 还提供了许多实用的功能和工具,例如 DevOps 工具链、应用程序模板、监控和日志分析等,这些功能和工具可以帮助用户更轻松地进行应用程序部署、自动化测试、CI/CD
流程和运维工作。
总之,KubeSphere 是一个功能强大的 Kubernetes 容器平台,为用户提供了便捷和可靠的工具和服务,帮助他们更好地管理和运行
Kubernetes 应用程序。
WordPress Chart 介绍
本章将介绍 WordPress Chart,它是一个预定义的 Kubernetes 应用程序包,包括 WordPress、MariaDB、Memcached 和其它必要的组件。使用 WordPress Chart 可以快速而简便地部署一个完整的 WordPress 环境,避免了手动配置和安装的复杂性。
在本章中,我们使用 Bitnami 提供的 WordPress
Chart:bitnami/wordpress
特点和使用
Chart 以多种方式简化了 WordPress 的部署和管理。
它提供了一个预定义的应用程序包,包括 WordPress、MariaDB、Memcached 和其他必要的组件,用户可以轻松地安装和配置它们。同时,它提供了一系列配置选项,使用户能够轻松地自定义
WordPress 的设置。
关键的是,它支持自动扩展、自动更新和自动恢复容器,确保 WordPress 应用程序始终保持最新和高可用性。
使用 Bitnami WordPress Chart 只需执行几个简单的步骤:
- 添加 Bitnami Chart 存储库到 Helm 中:
- 使用 Helm 安装 Bitnami WordPress Chart
- 配置 WordPress 和 MariaDB
代码示例如下:
helm repo add bitnami https://charts.bitnami.com/bitnami
helm install wordpress-instance bitnami/wordpress
在此教程中,我们不使用 Helm 直接部署,而是使用 KubeSphere 提供的基于 OpenPitrix 的应用商店。
安装到 KubeSphere
我们会演示如何使用 Helm 部署 Bitnami WordPress Chart 到 Kubernetes 集群,并讨论如何选择适当的 Kubernetes 命名空间、创建 PersistentVolumeClaim 和使用 Ingress 控制器将 WordPress 服务暴露给外部。
具体来说,我们将涵盖以下主题:
- 将 Bitnami Charts 存储库添加到 KubeSphere 应用商店中
- 选择适当的 Kubernetes 命名空间
- 安装 WordPress
- 配置 WordPress
- 使用 Ingress 控制器暴露 WordPress 服务
部署 WordPress Chart
本章节将介绍如何在 Kubernetes 集群中部署 WordPress,我们将使用 Bitnami 的 WordPress Chart 和 KubeSphere 来完成部署。
在本文中,您将学习如何在 KubeSphere 中添加 Bitnami 存储库,创建项目并使用 helm 工具安装 WordPress Chart。然后,我们将讨论如何配置 Ingress 规则,以实现从外部访问 WordPress 服务。通过本文,您将学会如何在 Kubernetes 集群中部署 WordPress,并将其对外开放以供访问。
添加 Bitnami Charts 存储库
要添加 Bitnami 存储库,请首先使用不低于 self-provider 角色权限的用户登录 KubeSphere 控制台。然后,前往工作台,选择要添加存储库的集群和工作空间。接下来,在左侧菜单栏中选择“应用管理”→“应用仓库”,单击“添加”按钮,然后输入 https://charts.bitnami.com/bitnami 作为存储库地址。
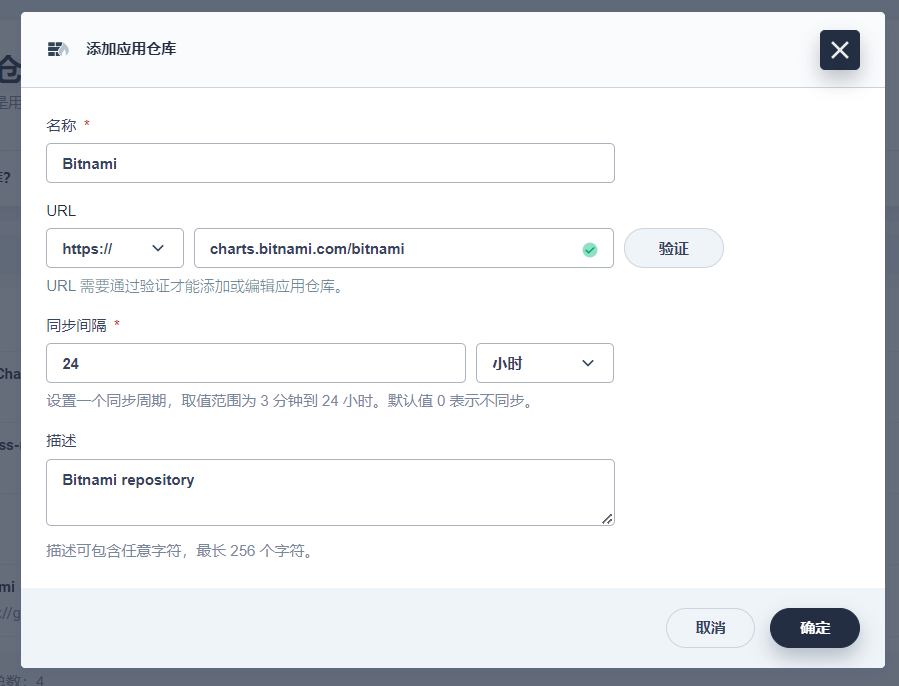
添加 Bitnami 存储库作为应用仓库
选择命名空间
在 KubeSphere 中,命名空间与项目是等同的。
要创建一个项目,请前往左侧菜单中的“项目”页面,然后在右上角单击“创建项目”按钮并输入适当的名称。
请注意,项目名称(即命名空间名称)在整个集群中必须是唯一的。我建议您在命名时尽量让名称与工作空间相关联,以便于区分,并避免重复。
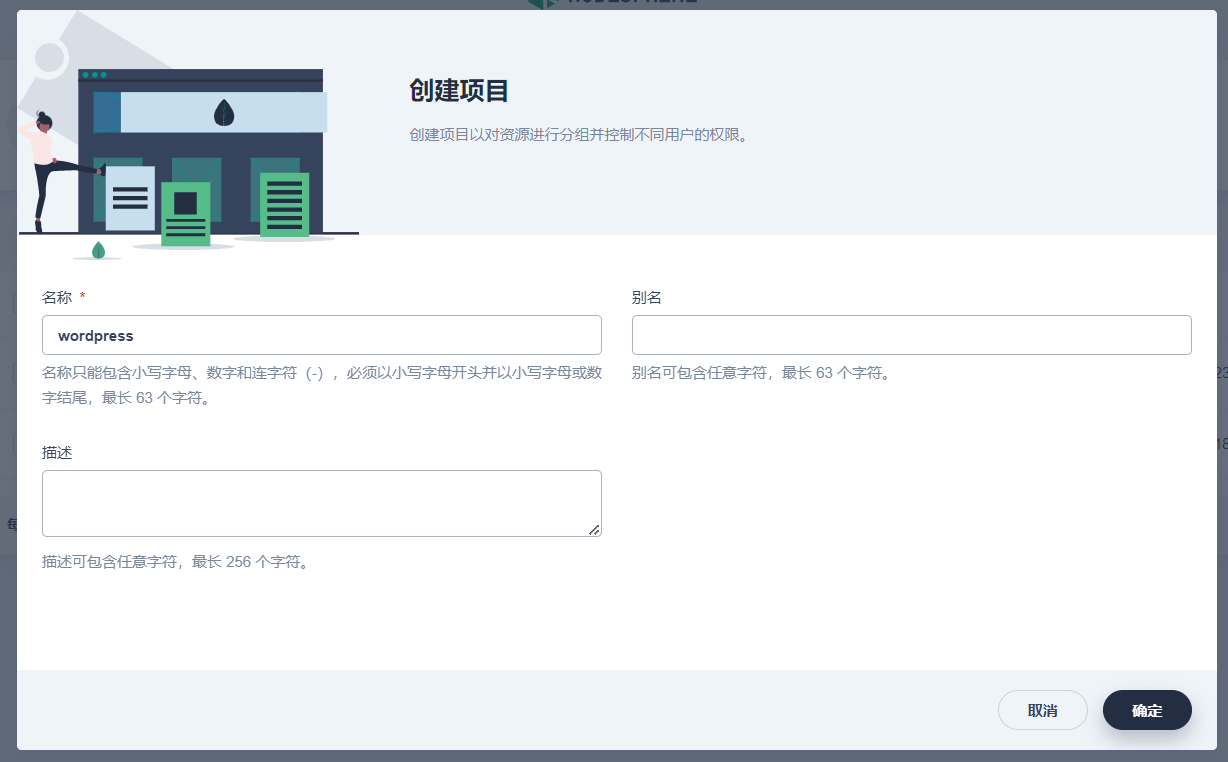
创建项目
安装 WordPress 应用
请前往“应用负载”→“应用”→“基于模板的应用”,单击右上角的“创建”按钮,然后选择“从应用模板”。接下来,在仓库选择器的顶部选择刚刚添加的
Bitnami 存储库,并搜索 WordPress。
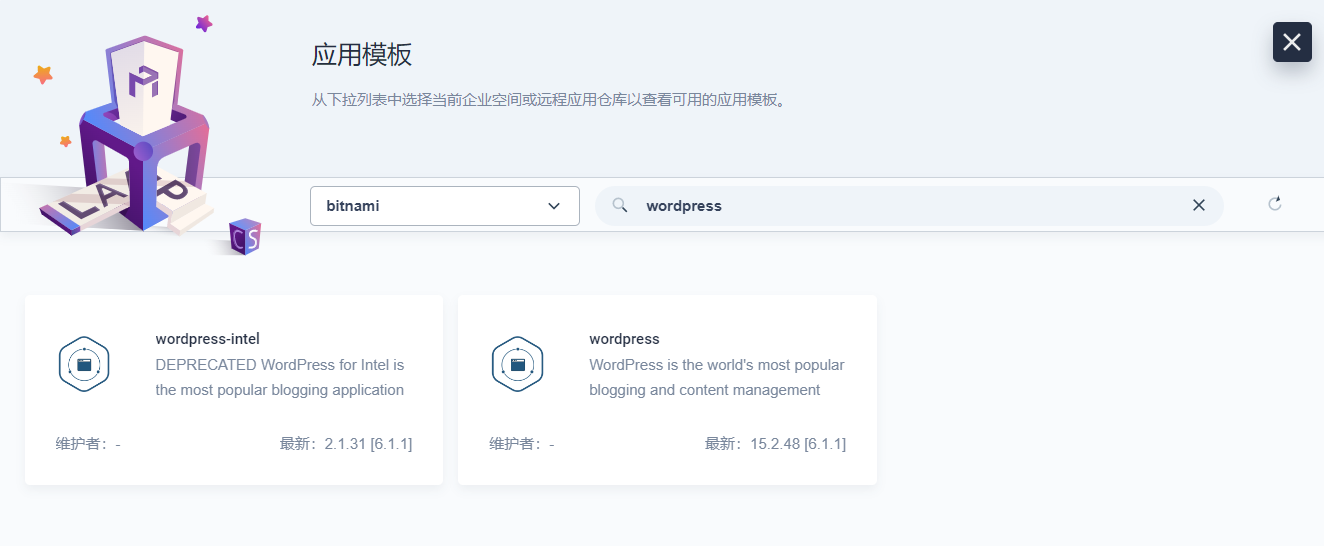
配置 WordPress
在应用设置的一步中,您需要对 WordPress 进行配置。
global:
  imageRegistry: ""
  imagePullSecrets: []
  storageClass: ""
kubeVersion: ""
nameOverride: ""
fullnameOverride: ""
commonLabels: {}
commonAnnotations: {}
clusterDomain: cluster.local # 集群域名,如果您使用 GKE 的 Cloud DNS 而非 Kube DNS,您需要在这里配置您的域名
extraDeploy: []
diagnosticMode:
  enabled: false
  command:
    - sleep
  args:
    - infinity
image:
  registry: docker.io
  repository: bitnami/wordpress
  tag: 6.1.1-debian-11-r57 # WordPress 镜像版本
  digest: ""
  pullPolicy: IfNotPresent
  pullSecrets: []
  debug: false
wordpressUsername: ahdark # Admin 用户的用户名
wordpressPassword: "" # Admin 用户的密码。空置会使用随机密码,并添加一个 Secret 到您的 Namespace 中
existingSecret: "" # 您可以通过 Secret 配置 WordPress 的用户名和密码
wordpressEmail: ahdark@outlook.com # Admin 用户的邮箱地址
wordpressFirstName: AH # Admin 用户的名字
wordpressLastName: Dark # Admin 用户的姓氏
wordpressBlogName: AHdark Blog # 博客的名称
wordpressTablePrefix: wp_ # WordPress 数据库表前缀
wordpressScheme: https # WordPress 协议
wordpressSkipInstall: false # 选择是否跳过 WordPress 安装。如果您要迁移 WordPress,可以选择跳过安装。
wordpressExtraConfigContent:
  - # 您可以在这里配置 WordPress 的 wp-config.php 文件,此部分内容将会附加到 wp-config.php 文件的末尾。
    $_SERVER['HTTP_X_FORWARDED_PROTO'] = 'https';
    define( 'WP_HOME', 'https://www.ahdark.blog' );
    define( 'WP_SITEURL', 'http://www.ahdark.blog' );
wordpressConfiguration: "" # 此配置将会覆盖 wp-config.php 文件内容
existingWordPressConfigurationSecret: "" # 您也可以通过 Secret 配置 wp-config.php 文件内容
wordpressConfigureCache: false # 选择是否自动配置 W3 Total Cache 的缓存功能
wordpressPlugins: none # 选择是否自动启用 WordPress 插件
apacheConfiguration: "" # 此配置将会覆盖 Apache 的 httpd.conf 内容
existingApacheConfigurationConfigMap: "" # 您也可以通过 Config Map 配置 Apache 的 httpd.conf 内容
customPostInitScripts: {}
smtpHost: "" # 您可以配置 SMTP 服务,这里会修改插件的设置。这个配置并不必要。
smtpPort: ""
smtpUser: ""
smtpPassword: ""
smtpProtocol: ""
smtpExistingSecret: ""
allowEmptyPassword: true
allowOverrideNone: false
overrideDatabaseSettings: false
htaccessPersistenceEnabled: false
customHTAccessCM: ""
command: []
args: []
extraEnvVars: []
extraEnvVarsCM: ""
extraEnvVarsSecret: ""
multisite:
  enable: false
  host: ""
  networkType: subdomain
  enableNipIoRedirect: false
replicaCount: 1
updateStrategy:
  type: RollingUpdate
schedulerName: ""
topologySpreadConstraints: []
priorityClassName: ""
hostAliases:
  - ip: 127.0.0.1
    hostnames:
      - status.localhost
extraVolumes: []
extraVolumeMounts: []
sidecars: []
initContainers: []
podLabels: {}
podAnnotations: {}
podAffinityPreset: ""
podAntiAffinityPreset: soft
nodeAffinityPreset:
  type: ""
  key: ""
  values: []
affinity: {}
nodeSelector: {}
tolerations: []
resources:
  limits: {}
  requests:
    cpu: 100m
    memory: 512Mi
containerPorts:
  http: 8080
  https: 8443
extraContainerPorts: []
podSecurityContext:
  enabled: true
  fsGroup: 1001
  seccompProfile:
    type: RuntimeDefault
containerSecurityContext:
  enabled: true
  runAsUser: 1001
  runAsNonRoot: true
  allowPrivilegeEscalation: false
  capabilities:
    drop:
      - ALL
livenessProbe:
  enabled: true
  httpGet:
    path: /wp-admin/install.php
    port: "{{ .Values.wordpressScheme }}"
    scheme: "{{ .Values.wordpressScheme  upper }}"
    httpHeaders: []
  initialDelaySeconds: 120
  periodSeconds: 10
  timeoutSeconds: 5
  failureThreshold: 6
  successThreshold: 1
readinessProbe:
  enabled: true
  httpGet:
    path: /wp-login.php
    port: "{{ .Values.wordpressScheme }}"
    scheme: "{{ .Values.wordpressScheme  upper }}"
    httpHeaders: []
  initialDelaySeconds: 30
  periodSeconds: 10
  timeoutSeconds: 5
  failureThreshold: 6
  successThreshold: 1
startupProbe:
  enabled: false
  httpGet:
    path: /wp-login.php
    port: "{{ .Values.wordpressScheme }}"
    scheme: "{{ .Values.wordpressScheme  upper }}"
    httpHeaders: []
  initialDelaySeconds: 30
  periodSeconds: 10
  timeoutSeconds: 5
  failureThreshold: 6
  successThreshold: 1
customLivenessProbe: {}
customReadinessProbe: {}
customStartupProbe: {}
lifecycleHooks: {}
service:
  type: ClusterIP
  ports:
    http: 80
    https: 443
  httpsTargetPort: https
  nodePorts:
    http: ""
    https: ""
  sessionAffinity: None
  sessionAffinityConfig: {}
  clusterIP: ""
  loadBalancerIP: ""
  loadBalancerSourceRanges: []
  externalTrafficPolicy: Cluster
  annotations: {}
  extraPorts: []
ingress:
  enabled: false
  pathType: ImplementationSpecific
  apiVersion: ""
  ingressClassName: ""
  hostname: wordpress.local
  path: /
  annotations: {}
  tls: false
  tlsWwwPrefix: false
  selfSigned: false
  extraHosts: []
  extraPaths: []
  extraTls: []
  secrets: []
  extraRules: []
persistence:
  enabled: true
  storageClass: ""
  accessModes:
    - ReadWriteOnce
  accessMode: ReadWriteOnce
  size: 32Gi # 您可以设定 WordPress 应用的 PVC 大小。如果您使用磁盘作为媒体库存储介质,您需要使此数值尽可能大。
  dataSource: {}
  existingClaim: ""
  selector: {}
  annotations: {}
volumePermissions:
  enabled: true
  image:
    registry: docker.io
    repository: bitnami/bitnami-shell
    tag: 11-debian-11-r92
    digest: ""
    pullPolicy: IfNotPresent
    pullSecrets: []
  resources:
    limits: {}
    requests: {}
  containerSecurityContext:
    runAsUser: 0
serviceAccount:
  create: true
  name: ""
  automountServiceAccountToken: true
  annotations: {}
pdb:
  create: false
  minAvailable: 1
  maxUnavailable: ""
autoscaling:
  enabled: false
  minReplicas: 1
  maxReplicas: 11
  targetCPU: 50
  targetMemory: 50
metrics:
  enabled: false
  image:
    registry: docker.io
    repository: bitnami/apache-exporter
    tag: 0.13.0-debian-11-r3
    digest: ""
    pullPolicy: IfNotPresent
    pullSecrets: []
  containerPorts:
    metrics: 9117
  livenessProbe:
    enabled: true
    initialDelaySeconds: 15
    periodSeconds: 10
    timeoutSeconds: 5
    failureThreshold: 3
    successThreshold: 1
  readinessProbe:
    enabled: true
    initialDelaySeconds: 5
    periodSeconds: 10
    timeoutSeconds: 3
    failureThreshold: 3
    successThreshold: 1
  startupProbe:
    enabled: false
    initialDelaySeconds: 10
    periodSeconds: 10
    timeoutSeconds: 1
    failureThreshold: 15
    successThreshold: 1
  customLivenessProbe: {}
  customReadinessProbe: {}
  customStartupProbe: {}
  resources:
    limits: {}
    requests: {}
  service:
    ports:
      metrics: 9150
    annotations:
      prometheus.io/scrape: "true"
      prometheus.io/port: "{{ .Values.metrics.containerPorts.metrics }}"
  serviceMonitor:
    enabled: false
    namespace: ""
    interval: ""
    scrapeTimeout: ""
    labels: {}
    selector: {}
    relabelings: []
    metricRelabelings: []
    honorLabels: false
    jobLabel: ""
networkPolicy:
  enabled: false
  metrics:
    enabled: false
    podSelector: {}
    namespaceSelector: {}
  ingress:
    enabled: false
    podSelector: {}
    namespaceSelector: {}
  ingressRules:
    backendOnlyAccessibleByFrontend: false
    customBackendSelector: {}
    accessOnlyFrom:
      enabled: false
      podSelector: {}
      namespaceSelector: {}
    customRules: {}
  egressRules:
    denyConnectionsToExternal: false
    customRules: {}
mariadb:
  enabled: true
  architecture: standalone
  auth:
    rootPassword: ""
    database: wordpress
    username: wordpress
    password: ""
  primary:
    persistence:
      enabled: true
      storageClass: ""
      accessModes:
        - ReadWriteOnce
      size: 16Gi # 您可以设置数据库占用的 PVC 大小
externalDatabase:
  host: localhost
  port: 3306
  user: wordpress
  password: wordpress
  database: wordpress
  existingSecret: ""
memcached:
  enabled: false
  auth:
    enabled: false
    username: ""
    password: ""
  service:
    port: 11211
externalCache:
  host: localhost
  port: 11211
需要注意的是,我建议您在 wordpressExtraConfigContent 中强制定义 WP_HOME 和 WP_SITEURL,否则 WordPress 将使用 Ingress
传入的动态域名,这可能会影响 Site Kit、Jetpack 等插件的使用。
使用 Ingress 暴露 WordPress 服务
为了实现从外部访问 WordPress 服务,我们需要在 Kubernetes 集群中配置一个 Ingress 控制器,并创建一个 Ingress 规则将访问流量路由到
WordPress 服务。
在 KubeSphere 中,您可以使用预装的 Nginx Ingress 控制器或安装其他支持的 Ingress 控制器。这里,我们将使用 Nginx Ingress
控制器来演示如何配置 Ingress 规则。
以下是一些基本的步骤:
- 部署 Nginx Ingress 控制器:您可以通过在 KubeSphere 中安装官方的 Nginx Ingress 控制器来部署它。部署成功后,您应该能够在
Kubernetes 集群中看到一个名为nginx-ingress-controller的 Deployment 和一个名为nginx-ingress-controller的
Service。如果您使用 KubeSphere 的网关,请跳过此步。 - 创建 Ingress 规则:前往应用负载→应用路由,创建一个 Ingress,定义一个 Ingress 规则,将 WordPress 服务暴露给外部。在 YAML
文件中,您需要指定 Ingress 规则的路径、主机和后端服务等。下方是一个示例。 - 解析对应域名的 DNS 到 Nginx Ingress 的外部访问 IP。
apiVersion: networking.k8s.io/v1
kind: Ingress
metadata:
  name: wordpress-ingress
  annotations:
    nginx.ingress.kubernetes.io/rewrite-target: /$2
    nginx.ingress.kubernetes.io/proxy-body-size: 80m
spec:
  rules:
    - host: example.com
      http:
        paths:
          - path: /
            pathType: ImplementationSpecific
            backend:
              service:
                name: wordpress
                port:
                  number: 80
在上面的示例中,我们添加了 nginx.ingress.kubernetes.io/proxy-body-size 注解,并设置其值为 80m,以允许更大的请求体。
完成上述步骤后,您应该能够从外部访问 WordPress 服务了。
配置 TLS (可选)
本段将讲述使用 Cert Manager 配置 Kubernetes Ingress TLS 的详细步骤。
方法一:使用 Cert Manager 配置 Certificate
- 部署 Cert Manager:首先,您需要在 Kubernetes 集群中部署 Cert Manager。您可以在官方文档中找到关于如何在 Kubernetes 集群中安装 Cert Manager 的详细说明。确保 Cert Manager 已经正确地部署并正在运行。关于 Cert Manager 的安装,请参考:Installation - Cert Manager
- 创建 Issuer 或 Cluster Issuer:在 Kubernetes 中,一个 Issuer 代表一个证书颁发机构(CA)。使用 Cert Manager,您可以轻松地创建 Issuer 并自动化证书颁发过程。您可以使用 Cert Manager 预定义的 Issuer 或创建自己的 Issuer。您可以参考 ACME - Cert Manager
- 使用 Cert Manager 的 Certificate 对象来创建证书。您可以使用以下 YAML 示例作为模板。
# Certificate for Cert Manager

apiVersion: cert-manager.io/v1
kind: Certificate
metadata:
  name: example-certificate
spec:
  secretName: tls-secret
  dnsNames:
  - example.com
  issuerRef:
    name: letsencrypt-prod
    kind: ClusterIssuer
在上面的示例中,我们创建了一个名为 example-certificate 的 Certificate 对象,并将其与要存储证书和密钥的 Kubernetes Secret
对象关联。我们还指定了要保护的主机名以及要使用的 Issuer。
请注意,我们使用了 ClusterIssuer 引用,这意味着我们使用的是集群范围的 Issuer。如果您在上一步创建的是 Issuer,您需要进行相应的更改。
在此之后,您可以在对应 Project(Namespace)的 Secrets 中查找名为 tls-secret 的 Secret,如果其存在且正常显示为 TLS
证书,则证书已创建完毕。
如果您使用的是 Cert Manager 预定义的 Issuer(例如 Let's Encrypt
Issuer),则证书签发过程可能需要一些时间才能完成。在这种情况下,您可以等待一段时间,然后重复上述步骤来验证证书是否已签发。
方法二:直接上传 TLS 证书
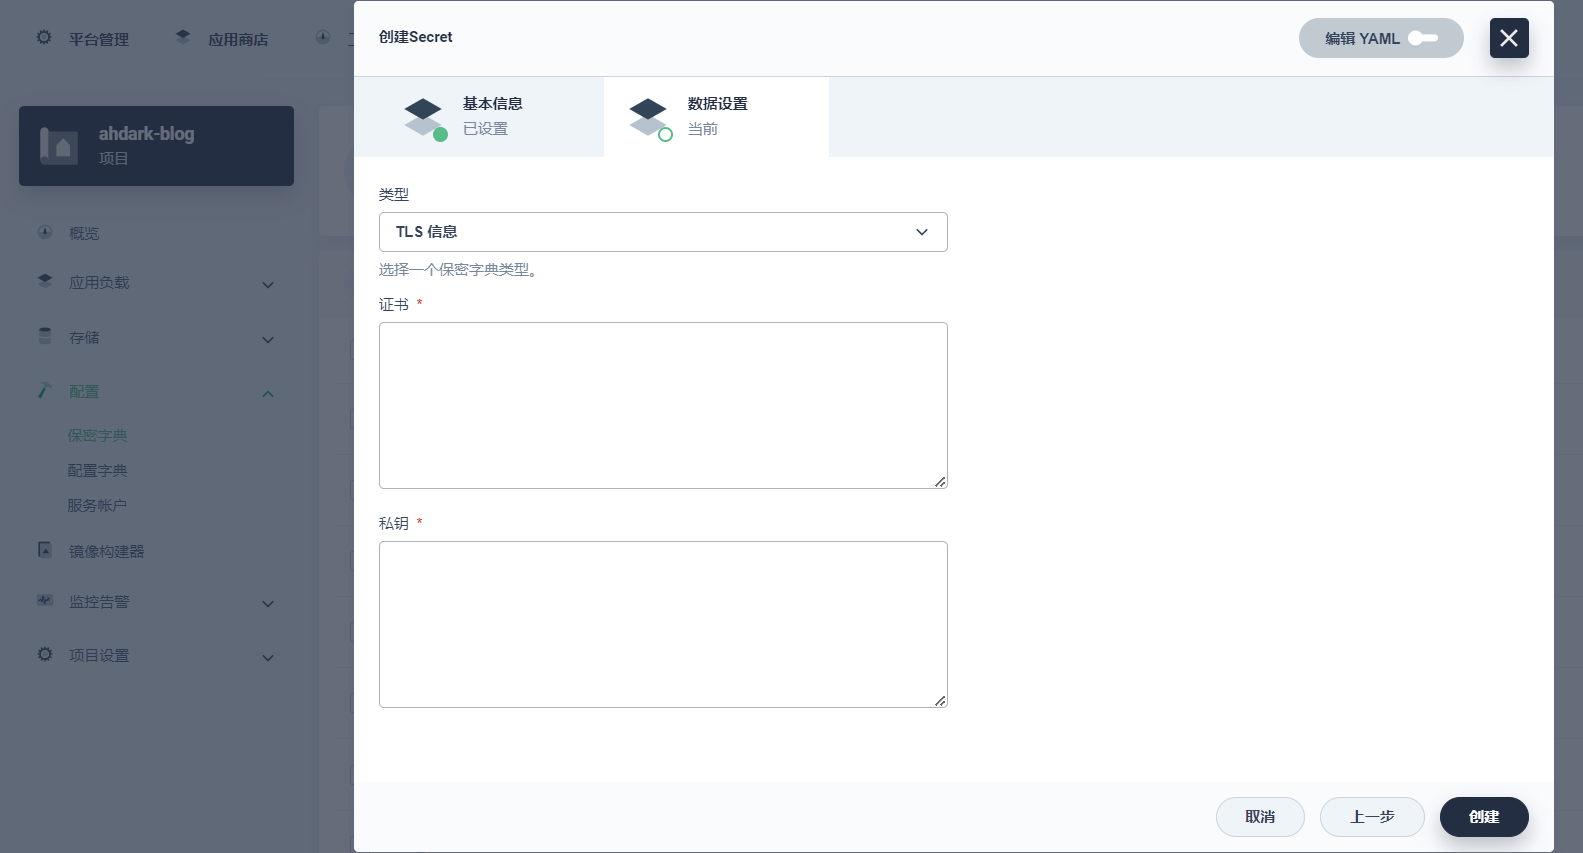
在 KubeSphere Console 中,您可以通过以下步骤在项目中创建保密字典,以存储 TLS 证书的公私钥:
- 在项目界面中,找到左侧菜单栏中的“配置”选项,并选择“保密字典”。
- 点击“创建”按钮,选择“TLS”类型,并填写保密字典的名称和命名空间。
- 在“数据”选项卡中,输入您的 TLS 证书公钥和私钥。
- 点击“创建”按钮,以保存您的保密字典。
通过这些简单的步骤,您就可以将您的 TLS 证书公私钥存储在保密字典中,以便在部署应用程序时使用。这将使您的证书更加安全,并且只有那些被授权的用户才能够查看证书的私钥信息。
绑定 TLS 证书到 Ingress
在 Kubernetes 中,您可以使用 YAML 文件定义 Ingress 对象,并将其与 Kubernetes Service 和后端 Pod 关联。在 YAML
文件中,您需要使用以下字段配置 TLS:
apiVersion: networking.k8s.io/v1
kind: Ingress
metadata:
  name: wordpress-ingress
  annotations:
    nginx.ingress.kubernetes.io/rewrite-target: /$2
    nginx.ingress.kubernetes.io/proxy-body-size: 80m
spec:
  tls:
  - secretName: tls-secret
    hosts:
    - example.com
  rules:
  - host: example.com
    http:
      paths:
      - path: /
        pathType: ImplementationSpecific
        backend:
          service:
            name: wordpress
            port:
              number: 80
点击保存后,Ingress 将被更新。
测试和故障排除
测试和故障排除是 Kubernetes 应用程序维护的重要组成部分,它可以确保应用程序在部署后能够正常运行,并且在遇到故障时能够及时诊断和解决问题。
监测应用指标和故障解决
当您使用 KubeSphere Console 这一可视化工具来部署和管理您的 Kubernetes 应用程序时,调试过程通常会更加简单。
您可以使用 KubeSphere Console 的内置调试工具来快速诊断和解决问题:
- 在 KubeSphere Console 中查看日志:您可以在 KubeSphere Console 的应用程序页面中,通过点击 Pod 的名称,快速查看 Pod 和容器的日志。
- 检查 Kubernetes 资源:使用 KubeSphere Console 中的资源页面查看 Kubernetes 资源的状态,并确认它们是否正常运行。
- 使用 KubeSphere 事件中心:KubeSphere 事件中心可以记录应用程序的事件和警报信息,包括 Pod 和容器的启动、停止和错误状态。您可以使用 KubeSphere 事件中心来诊断应用程序的问题。
通过以上步骤,您可以在 KubeSphere Console 中调试您的 Kubernetes 应用程序,以确保它们始终保持高可用性和稳定性。
测试 Web 页面
当应用程序部署完成后,您可以在您指定的 Ingress 位置查看到站点内容。为了确保应用程序的正常运行,您需要进行一些测试,以下是一些测试应用程序的方法:
- 访问站点:使用浏览器访问站点,并确保能够正常显示内容。检查页面的布局、图像、链接等,以确保站点的正确性。
- 登录 WordPress 控制面板:访问 WordPress 站点的控制面板,并使用管理员账户登录。检查 WordPress
后台的布局、插件、主题、文章等,以确保您可以正常管理站点。 - 添加文章或页面:在 WordPress 后台中添加一篇新的文章或页面,并发布。检查该文章或页面是否可以在前台正确显示。
- 测试插件:如果您使用了 WordPress 插件,请确保它们能够正常工作。测试插件的方法取决于插件的功能,例如测试联系表单、社交媒体分享等。
- 测试自定义域名:如果您在 Ingress 中使用了自定义域名,请确保您可以通过该域名正确访问站点。您可以使用
nslookup或dig命令来测试域名的解析情况。
通过以上测试,您可以确保您的应用程序能够正常工作,并在出现问题时及时发现和解决。
总结
通过本文的介绍,您应该已经了解了如何使用 Kubernetes 和 KubeSphere 部署和管理 WordPress 应用程序,并使用 Cert Manager 配置
Ingress TLS 以实现安全的外部访问。在本文中,我们重点介绍了以下内容:
- Kubernetes 和 Helm 的基础知识:您需要了解 Kubernetes 和 Helm 的核心概念和基本操作,以便更好地管理和部署应用程序。
- KubeSphere 的介绍:KubeSphere 是一个基于 Kubernetes 的容器平台,它提供了一些实用的工具和功能,使应用程序部署更加简单和可靠。
- 部署 WordPress 应用程序:您可以使用 Bitnami 的 WordPress Chart 在 Kubernetes 中部署和运行 WordPress
应用程序。在部署应用程序之前,您需要配置和安装必要的组件和插件,并使用 Ingress 配置外部访问。 - 配置 Ingress TLS:为了确保数据传输的安全性,您可以使用 Cert Manager 配置 Ingress TLS。这需要创建证书、安装 Cert
Manager、创建 Issuer 和 Certificate 对象,并配置 Ingress TLS。 - 测试和故障排除:在部署应用程序后,您需要进行一些测试和监控,以确保应用程序能够正常运行。在出现问题时,您需要快速诊断和解决问题,以保证应用程序的高可用性和稳定性。
通过本文的指导,您应该可以轻松地部署和管理 WordPress 应用程序,并确保应用程序的安全性和稳定性。同时,本文也为您提供了一些有用的技术和工具,以帮助您更好地管理和部署
Kubernetes 应用程序。
在本文撰写的过程中,我也完成了对于一个测试性 WordPress 应用程序的部署,即您现在所见到的 ahdark.blog 站点。此站点运行于 Kubernetes ,使用 Google Compute Engine 作为基础设施提供商。如果您对于 Kubernetes 的高可用性和便捷性感兴趣,您可以前往订阅 Telegram 频道 @AHdark_Channel 以获取更多实时动态。


